Showing posts with label handmade present. Show all posts

Little things

A couple of weeks ago a friend asked if I could make a little present to welcome a new baby girl into the world. I have made a few things to order and still every time I feel honoured... not to mention a little bit anxious.

While she was sleeping, I made a bib and jazzed up a onesie for my friend.


I used quilting cotton and terry towelling to make the bib from a pattern I drafted myself.

I added flutter sleeves to a sleeveless onesie I bought from Target using this tutorial. The heart appliqué looked a little boring by itself, so I hand sewed a little ribbon bow on it. 


Cute and easy. Oh how I wish I had a sewing machine while Little Monkey was a baby!


Pin It

Nappy wallet and tutorial

When Little Monkey was a baby I thought a nappy bag was the greatest invention... Then we reached the stage when I didn't need to pack half of her wardrobe to go out. All I needed was a couple of nappies, a box of wipes and a changing mat. I am a bit embarrassed to admit that for a long time I carried this emergency kit in a plastic bag. Until one day I sat down and made myself a nappy wallet. Thinking back I cannot believe it took me so long to get organised. Nappy wallets are so easy to make, and they sure look a lot better than a plastic bag!

Recently, While she was sleeping, I made a nappy wallet for a friend. It comfortably fits two walker size nappies, a slim nappy box and a small changing mat.


I took photos of every step of the process, so if you are looking for a detailed nappy wallet tutorial, please click Read more.

Fabric covered beads necklace for a toddler with tutorial

When I was a little girl I could not resist my mum's jewellery box. Getting her jewellery out and trying things on was one of my favourite things to do. I loved to play with her necklaces and wore them around the house pretending I was a grown up.

I think all girls do that. My Little Monkey is no exception. She loves to wear my necklaces. Often she  wears a couple and then brings a couple for me to wear. Very cute!

Recently I made a reversible scalloped skirt for her - the Bluebell skirt. I thought the skirt needed soemthing to go with it. A fabric covered bead necklace! Of course! I have been wanting to make one for a few months now. What a great excuse to finally do it.

So, while she was not sleeping when she should have been, I made this little thing:


Isn't the necklace cute? It is very easy for a toddler to put on and take off. It won't fall apart any time soon. It compliments not just one skirt, but a lot of other outfits. Besides, it is fun to play with - bonus :)

This necklace was very easy to make, too. Would you like to have a go? Please click Read more to follow my steps.

Electronics case - tutorial

A few weeks ago I made some takeaway coffee cup cosies for the ladies at my work. My lovely co-workers know that I make most of my daughter's clothes, but I think they were quite surprised to see something different. After spending some time admiring their new cosies one of the girls asked if I could make a new case for her mobile phone.

So, While she was sleeping, I made a mobile phone case for my co-worker. It was a very easy project and I had a lot of fun making it! I made a padded case with a flap. I think my phone case turned out pretty cute and it is oh so functional. This is also a great gift idea.


Would you like to make a case for you phone, I-Pad or any other electronic device? I will tell you what I did. Please feel free to follow my method.

I used quilting cotton for the top layer and lining, and pre-washed bamboo wadding in the middle. You could use different fabrics for the middle layer, like fleece or flannelette, or not worry about any padding at all. I used a walking foot for this project.

I cut out two large rectangles out of each fabric and wadding - for the front and the back of the case, and one small rectangle of each for the flap.

How did I determine the size of rectangles? I measured the phone. The length of the rectangle is the length of the phone + the thickness of the phone x 2 + preferred seam allowance. The width of the rectangle is the width of the phone + the thickness of the phone x 1 1/2 + preferred seam allowance. And for the flap - whatever I thought would look nice :) Making a pattern this way worked for me with the materials I chose to use. You might want to play around to find what works for you taking into account materials you use. If in doubt - make it bigger. You can always make this case smaller and adjust your pattern for future references. What do we have to loose? Only a little bit of fabric :) 


I started sewing with the flap. I put the three layers on top of each other in this order: fabric pieces right sides facing (in simpler words - brighter coloured sides together) with fabric that would be on the inside of the case on top, fabric that would go on the outside of the case in the middle, and wadding at the bottom.


I cut a piece of elastic and tied knots on both ends. I did this to help prevent the elastic slipping out any time soon.


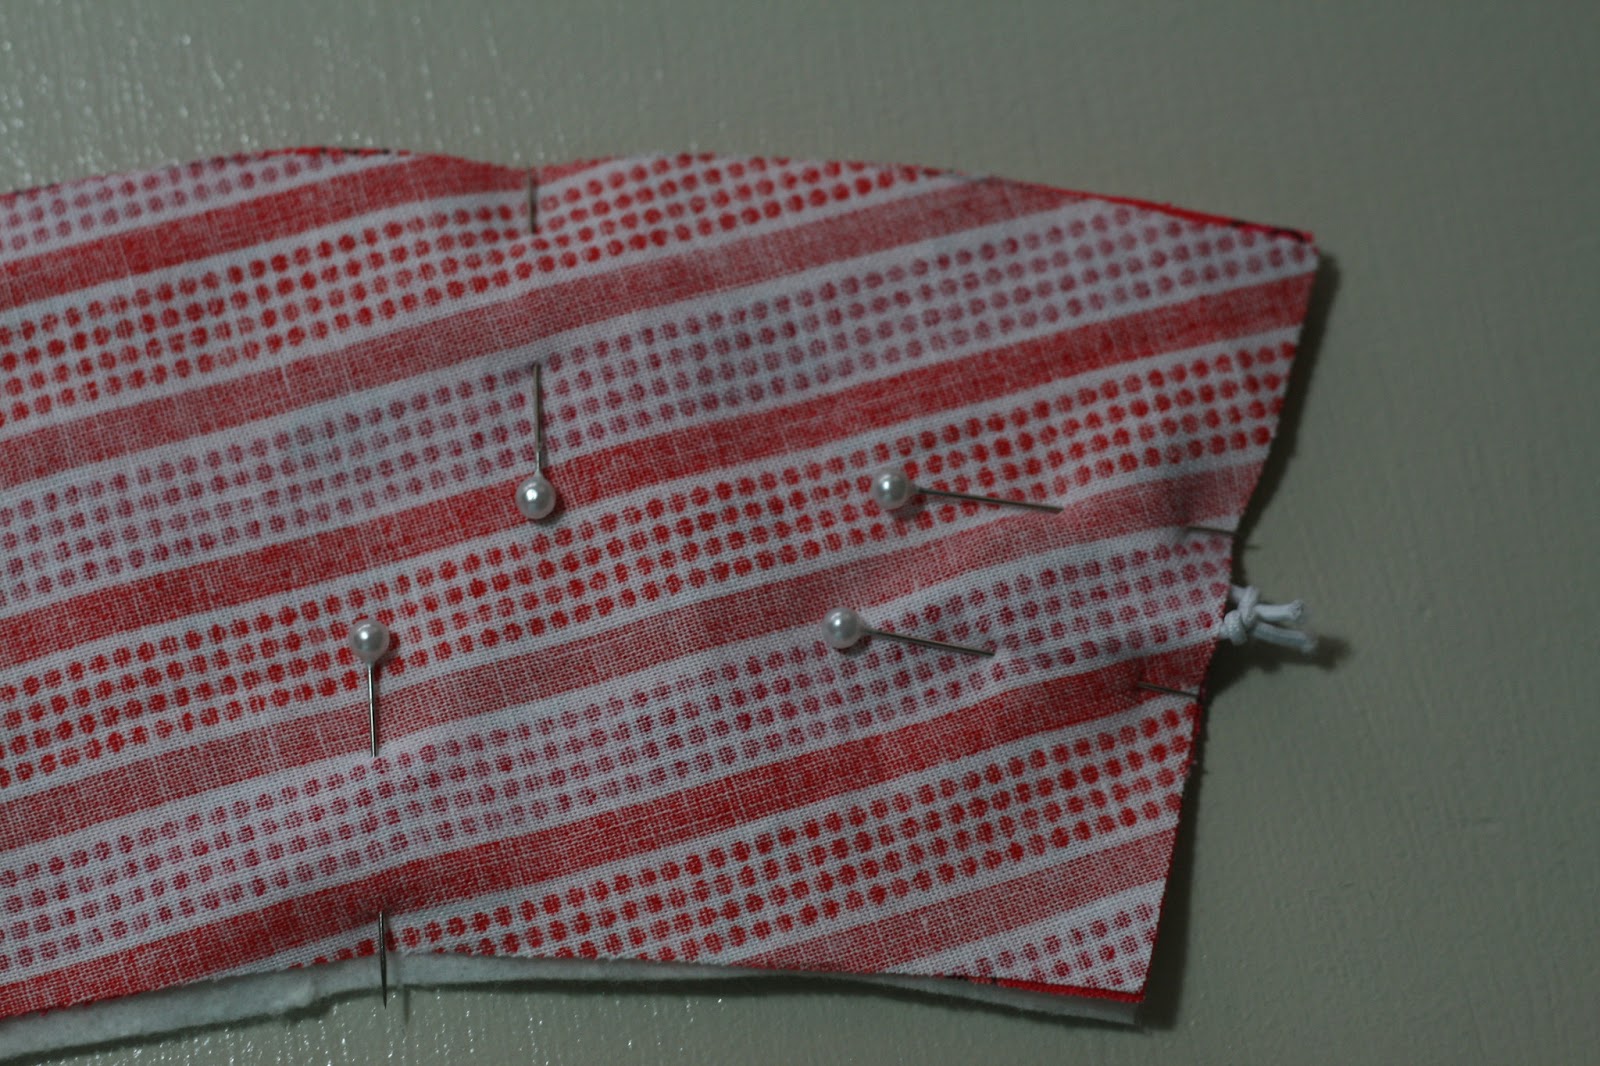
I placed the elastic loop between the two layers of fabric and pinned all the layers together. I worked out that by placing my super secure elastic loop this way I would not see or feel the knots under the top layer of the cover.


I stitched around three sides, clipped the corners, trimmed any excess fabric,


turned the flap right side out and finally pressed. Nice, hey?


Now it was time to make the case. For the front of the case I pinned my three layers in exactly the same manner as when I was making the flap.


I did the same for the back but also placed the flap between the two layers of fabric, just like in the following pictures:

Flap shown between two layers of fabric

Back section showing position of flap 

Then I pinned all the layers, stitched (AT THE TOP only), trimmed excess fabric,


folded them the way they would be and pressed.


Next, I unfolded the front and the back pieces, placed them on top of each other with right sides facing (yep that's right - brighter coloured sides together) so that padded sections ended up on top of each other. Yes, it looked a little thick, but it worked great.

I pinned my halves together,


stitched around leaving an opening at the bottom of the lining like in the following pic, clipped the corners and trimmed excess fabric. When I made another case I also trimmed excess fabric on the fold - see the seam in the middle where on one side I have two layers of fabric and two layers of wadding, and only two layers of fabric on the other? How? Easy. Once I sewed around, I picked the case up, folded it along the seam in the middle and trimmed the corners - just like I usually would. What can I say - you live, you learn :)


Next, I turned the cover right side out,


turned out corners, turned the raw edges towards the inside of the cover and stitched along the side.


Next, I pushed the lining inside the cover, pressed it again,


and sewed on a button.


Simple! 

Please let me know if you make a cover using this tutorial. I would love to hear from you and have a look at the pictures (if you take pictures of your creations). I would appreciate a link back to this tutorial should you choose to use it.

Take away coffee cup cosy - tutorial

Some things are so much fun to make! I made a takeaway cup holder/cosy/sleeve/call-it-anything-you-like thingo for my Covert Robin partner. You can read about it here. I had so much fun making it that I made one for each girl in my office. These little cup cosies make a great present.


There are a lot of tutorials for cup cosies on the Internet. I am not saying my way is the best, but it certainly worked for me.

First thing first. I needed a pattern. I went to a coffee shop near my work and asked if all takeaway cups were the same size and what size was the most popular. I don't drink coffee, so I don't know about such things. I told the ladies at the coffee shop what I was doing. They thought it was a great idea and gave me a cup.

To make a pattern, I rolled the cup on paper and outlined the top and the bottom as I went along, just like in this photo. By the way, no intentional product placement here! Once you have done this, trim as little or as much as you like - it all depends on how wide you want your cosy to be. I had to adjust my pattern a few times before I was happy with it.


Next, I cut out fabric pieces. I used quilting cotton for the outer layers and pre-washed bamboo wadding for the middle layer.


I cut a bit of elastic and tied nots on both ends since I was a bit paranoid it might slip out. C'mon, we all have some irrational fears :)


I put the three layers on top of each other in this order: fabric pieces right sides facing with fabric that would be on the inside of the cosy on top, fabric that would go on the outside of the cosy in the middle, and wadding at the bottom. This way you would not see or feel the knots on the elastic under the top layer of the cosy.


Then I pinned all three layers, and placed elastic between two fabric layers:


I stitched around the cosy leaving an opening on the 'blind' side to turn the cosy inside out. I did it this way so I would not have to worry about trying to making corners look neat when I turn the cosy right side out.

I clipped the corners, trimmed excess fabric, 


and turned my cosy right side out. See how neat my corners looked? I was pretty happy. Then I turned the raw edges towards the inside of the cosy and pressed it.


Back to the machine to sew around the cosy.


Next, I marked where I wanted the button to go. I love buttons. Not only are they functional, they can add character to an item.


What was left to do? Just to sew on the button. Done. I swear it took me longer to pick fabrics for the cosy than to actually make it.


Please let me know if you make a cosy or two using my hints. I would love to hear from you and have a look at the pictures (if you take pictures of your creations). I would appreciate a link back to this tutorial should you choose to use it.

Personalised book and tutorial

I love making special little things for little people. One of my friends has a beautiful cheeky little boy Jonas. A few weeks before his first Birthday I asked my friend about some ideas for a handmade pressie for him. One of the things she suggested was a library bag. I started thinking how I could make a cool personalised library bag for this little man. Then, I got this image of a book where there was a picture – an appliqué – that corresponded to each letter of his name. The image was so vivid that I knew I had to make Jonas a personalised book. It had to be a fabric book so it could be washed and it had to be colourful. Because little people look with their hands, I wanted to use materials that would be fun to touch and safe to pull. So, While she was sleeping, I made this little thing:
J is for Jeans

O is for Octopus

N is for Number Nine

A is for Apple

 S is for Sun

Jonas’ mum tells me he loves his new book and that his daddy loves it even more :)

This was my first experience making a fabric book. It looks handmade, naïve and simple. There are a few mistakes, but it was certainly made with love. 

If you would like to have a go, you will need:

Fabric for the cover of the book
Coordinating fabric for the strap
Fabric for pages
Iron on interfacing
Colourful scraps of fabric
Bondaweb/Wonder Under type of stuff
Velcro
Scissors, iron, pins, threads, sewing machine – of course.
Buttons, ribbons, rickrack, etc for decorations. 
I cut out a template for pages 17x16 cm, 1 cm seam allowance included. 

For the cover, I cut one piece out of a checked fabric, one out of calico and two of iron on interfacing on fold.

For the remaining pages, I cut out one piece out of calico and one out of iron on interfacing for each letter and appliqué. In total, two of calico and two of interfacing for one page.
First, I prepared appliqués. While my appliqués were cooling down, I ironed interfacing onto the wrong sides of all pages and cover.


Then I cut out appliqué pieces. My desk looked very busy and colourful!


Next – I ironed appliqués onto calico pages. Make sure you take into account which side of a page is going to be sewn into the cover and work out the centre of the page accordingly. When I was making Jonas’ book I made a mistake and ironed on pictures and letters allowing 1 cm on the same side. Oops.

Now I had a pile of pages. It was time to stitch around letters and pictures. I was going for a somewhat rough look, so I used Zigzag stitch.


Then it was time to assemble pages (yahoo). I carefully paired up letters and pictures, pinned right sides together,


stitched around 3 sides and trimmed the corners as well as the fabric along the seams (just makes things look neater).


Turned inside out… Pressed. Repeated for all remaining pages.


To make the cover, I marked where I wanted Velcro to go, stitched it on and then followed the same steps as for making pages. Just leaving a small opening on the back cover where the strap would go.

Now it was time to make a small strap.

I cut a rectangle out of the same fabric I used to make the cover for the book, stitched three sides together, cut the corners, trimmed the fabric along the seam, turned inside out, pressed, and stitched Velcro in place. 


Once the strap was ready, I put all the pages inside the cover to see how far the strap had to go into the opening on the cover so it closed nicely. Then I trimmed the strap and stitched it in place. In fact, I stitched all around the cover of the book as I thought it would look nice.


Next, I put all the pages one on top of another and machine basted them together.


Then, I placed pages inside the cover, hand basted them in place again and stitched them using my machine. I think I should have used a walking foot because my machine nearly ‘choked’ sewing this. 

How I made the Octopus and the Sun:

I carefully marked where I wanted the head of the octopus to be. I cut eight pieces of rick rack, tied knots on one end to prevent them from fraying and pinned them in place.


I stitched just inside the head to secure them. I didn’t want the Octopus to loose its legs after only a few read/play sessions.


The head was ironed on (just as you would for a regular appliqué)...


... then I stitched around using a Zigzag stitch and hand embroidered the face.

 
Enjoy :)